Bathroom Cabinet Makeover <$100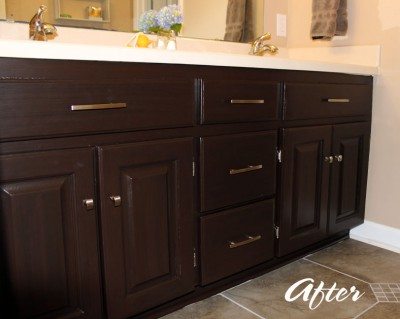
 Good bones! That was one of my favorite sayings when trying to convince my husband we needed to purchase our house. It definitely needed some work, but it had good bones and that was hard to find. He declared me crazy having never heard the term “good bones” but apparently trusted my judgement enough to move forward with the purchase.
One of the rooms that needed a little imagination was the guest bath. The sink area was carpeted (???) and the previous owner had attempted a terrible painting job on the oak cabinets that left them looking beat up and yellow. You could see the oak grain through the paint and only half the baseboard got paint. The lighting is shiny brass and the mirror is rusting around the edges. I’ve certainly seen worse bathrooms before, but cosmetically this one was in rough shape. Before we even moved in, we had all the carpet and nasty tile in the toilet/tub area ripped out and replaced with porcelain tile. There are some things I’m willing to live with, but carpet in a toddler’s bathroom isn’t one of them.
We lived with the bathroom for a year after the tile was installed and I used an upcoming visit from my parents as an excuse to do a small update. We had great success with Rustoleum’s transformation kit on my friend’s counters a few weeks back (read How To Transform Countertops in a Weekend – Easy and Affordable DIY) and I was anxious to give the cabinet transformations a go. I read a ton of reviews and decided on the dark kit (the white kit seemed to give users a little more trouble). I purchased Rustoleum’s Cabinet Transformation Kit (Dark) from Home Depot for $75 plus tax. The kit comes with everything you need to refinish 100 sq. ft. of cabinet. My bathroom cabinet wasn’t even half that size so I knew the kit would cover it. There were 24 colors to choose from and I was on the fence between the Federal Gray and the Espresso. I got the box home, opened it and realized I should have chosen the color BEFORE I left Home Depot because they have to tint the base coat for you. **I repeat, you will have to return to the store if you don’t get the base coat tinted before you leave.** It wasn’t a huge deal, but I was slightly annoyed it wasn’t more apparent on the box. Then I was annoyed at the cashier for not mentioning it. Because cashiers should know everything about every product a store sells. 🙂 I decided on the Espresso color because the tile is a gray/brown stone color and the counters are an off white cultured marble. I didn’t want the gray to be too cool for the warm tone browns and I also wanted noticeable contrast between the floors and the cabinet. So back to Home Depot I went and a few minutes later I was on my way home with my Espresso tinted base coat. It looked like dark chocolate which put me in a spectacular mood. All chocolate does, edible or not.
Saved A Few Dollars
I already had the additional tools the instructions recommended (paint brushes, painters tape, gloves, etc) so I didn’t purchase anything else. The instructions are very detailed and list everything you will need in addition to what comes in the kit. I watched the instructional video a couple time to make sure I had a good feel for what needed to be done. I headed upstairs with some zip lock bags (to separate the hardware) and my electric drill. The video recommended putting everything in plastic cups but I was fresh out and I have a surplus of zip lock bags. I removed all the hinges, knobs and handles and put them in separate bags. It made for a MUCH faster reinstall when the time came.

Cleaning and Deglossing
Cleaning the cabinet doors & base and deglossing them came next. This was by far the most labor intensive step. The deglosser that comes with the kit is supposed to be good for any surface (laminate, wood, metal, painted, etc) and should have eliminated the need for sanding. The instructions say you know you’ve “deglossed” enough when there is a matte appearance on areas that were once shiny. Given that my cabinets were painted with a high gloss white paint, that made this step very difficult. I had to use a lot of pressure with the scouring pad to get the gloss to go away. My arms were sore the next day from the effort and I could still see shiny on the crevices. I ended up using a sanding block on those areas because I was tired of relying on the deglosser. Maybe it works better on stained wood or laminate, but in my experience, sanding worked just as well, if not better on the painted wood. I used the deglosser on the base cabinet, wiped it down, and then gave it a very light sanding. It’s important to wipe everything down several times with a damp cloth to make sure all the residue is cleaned off.
Apply the Tinted Base Coat


Applying the first of two base coats was next. I used a relatively light first coat as I got the feel for coverage and it dried quickly. The most important thing about the paint is not to let it settle in the crevices or on the corners of the doors. I used a dry sponge brush to brush out excess paint as I saw it start to pool. The second coat went on smoothly and I left things to dry for the afternoon.
To Glaze or Not To Glaze
 I debated whether to use the glaze because the cabinets were already so dark. I’m SO glad I went ahead with the glazing. It gave the wood a tobacco colored streak that looks so rich! Glazing was more difficult than I anticipated, only because I couldn’t seem to keep fuzz from the glaze cloth (included with the kit) & dust particles from sticking to the doors. No matter how wet or dry the white gauzy glaze cloth was, it left white fuzz on the doors. I had to sand down one of the doors and re-glaze it because there was so much fuzz. Eventually though, I got the doors looking good and left them to dry. I used a foam brush to touch up some of the edges that had been sanded off from my fuzz removal.


Apply The Topcoat
The top coat was the last step in the paint process. It was an unusual milky white mixture and I was initially worried something was wrong with it. It didn’t look like any top coat I have ever applied. I applied it very lightly to the back of the cabinet doors (per the instructions). It was very runny and bubbled up a little when I applied it. I had to be careful not to apply it too quickly or the bubbles were hard to brush out. Be sure not to apply it too thick, because when it accumulates it dries white, almost like glue. I wish I had started with the front of the cabinet doors first (contrary to the instructions) because the top coat drained down the sides and pooled at the edges of the cabinet and dried white. I had to scrape it off the edges and touch it up. So my advice would be to apply the topcoat to the front of the cabinet door first. At least that way, if the top coat does drain some down the side you won’t see it when the door is closed.
Reassemble & Enjoy!
Once the top coat dried, I moved everything back upstairs to reinstall the hardware and re-hang the doors. The entire project probably took a total of 12-15hrs. I had to work in between naptime & after bedtime so it was a little broken up for me, but it was a totally do-able project for a weekend. I had an entire unopened can of base coat left (the kit comes with 2 cans), 3/4 can of glaze and the can of topcoat was still almost full. I’m not sure if that means I did something wrong with the topcoat but I feel like if I had used anymore the cabinets would have had a white-ish film on them. I’m happy with the look of everything so I’m not too worried about the excess topcoat leftover. I will use what’s leftover to refinish something else down the road (maybe a nightstand or bookcase). This project was very affordable and the results were awesome. Anyone looking for a quick update (think flipping a house or getting one ready for sale) or just interested in redoing cabinets without breaking the bank will be pleased with this product!

Hi there, I just found your blog as I am researching redoing my small bathroom with the same kit you had used. I absolutely love the finished product! You did a great job! My question for you is how did you paint the inside of the doors? Did you lay them down on 2×4’s and wait in between coats to paint the back and the front?
I want to tackle my small and only bathroom inside my ranch house this Labor Day weekend. I figure if I start on Friday and remove the doors, and 3 drawers and possibly even redo the mirror 3 days should give me enough time.
Thank you for your great post!
Yolanda
Hey Yolanda! Thanks! I was really pleased with the results too. I definitely think 3 days is enough time to update your bath. It was an easy project. The Rustoleum instructions recommend you use a couple 2×4’s with nails in it (they show you how to build it) to elevate the doors so they dry properly and don’t stick to whatever you are painting on top of. I didn’t do that. 🙂 I kind of rigged my own platform out of the tops of old storage boxes I had. It worked fine. I did let the front coat dry before I painted the backs of the doors and I think I might have only used one coat on the back. The paint dried pretty quickly between coats. I didn’t care as much how the backs looked so I didn’t glaze them which saved some time. I had more than enough paint leftover so I painted the inside of the cabinets and the drawers too (no glaze). It helps to make the cabinets & drawers look more uniform. Love to see after photos when you are done! Thanks for your post!