 DIY No Sew Book Slings

If you have young kids in your house, you no doubt have a mountain of books. Yay for reading and all the brainy things that go with it, but storage and easy access to the books can become an issue after a while. I decided to make use of some empty wall space in my son’s playroom by making a couple book slings to hold our ever growing collection of books. Some day, when I have some free time (yes, I’m sure it will happen..almost completely sure at some point I will have free time again) I will learn to sew. I don’t see that happening anytime in the near future and so I rely on a magical product called Steam-A-Seam when I need to whip something up that resembles something that would otherwise need to be sewn.
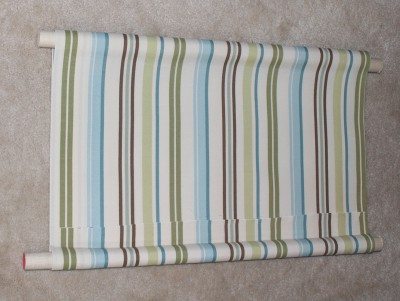
I bought about 3 yards of striped blue & green fabric at Old Time Pottery one afternoon (my OTP has a great, huge table with fabric remnants) and decided to tackle the surplus book situation at my house. To make one book sling (as shown), you will need 2 double curtain rods brackets, 2 dowel rods and fabric twice as long as you want the sling to be (more exact dimensions for the slings pictured will be listed below). The bottom sling in the photo was made with a standard, pre-cut 1″ x48″ dowel rod, while the upper sling had to be cut down to accomodate the shorter space next to my light switch. The friendly folks at Lowes will cut the rods down to your desired length if you ask before you leave. For this blog, the dimensions I include will be for the upper (shorter) book sling. The finished dimensions of the shorter sling are 21-1/2″ w and 7″ tall.
- Step 1. Cut the fabric to desired length. In my case it was 32″long and 27″ wide. To get to this number, I measured the wall space I had and decided on a 25″ dowel rod. That meant my book sling would need to be slightly less wide to account for the bracket width and I settled on 21-1/2″ for my final sling width. I knew I would need at least 2″ to fold over on each side to create the seam. I actually decided to use 2.75″ because I wanted the folds to line up with the stripe. It made cutting the fabric much easier (and straighter) if I cut along a stripe. To determine the length of the fabric, I doubled the height of the booksling (in this case 7″), doubled that number again (14*2) and then added 4 additional inches for the flap that would create my dowel pocket. Confused yet? I’ve attached some photos with dimensions to help illustrate.
- Step 2. Fold the sides of the fabric over between 1 & 2 inches to create the “seam”. Iron the sides to create a crease in the fabric. Iron the remainder of the fabric to get rid of any additional wrinkles that be may present (For this sling, I folded the sides 2.75″ because that’s where the colored stripes happened to occur. I followed the line of the stripe which helped me make sure the finished piece would be straight.)

- Step 3. Lay a strip of Steam-A-Seam along the inside of the crease. Lay it sticky side down and then remove the paper backing from the other side.
- Step 4. Fold the fabric over the Steam-A-Seam and then iron it. Keep the iron on each section for 5-10 seconds to ensure the seam product gets hot enough to bond to the fabric. Allow it to cool completely.
- Step 5. Repeat Step 3 on opposite side of fabric. Both sides should now have a clean, crisp edge. I left the top and bottom unfinished because you’ll never see those edges and I was afraid the seams might get bulky at the corners if I folded them over.
- Step 6. Fold the fabric in half, over first dowel rod. This will create the first pocket needed to hold your dowel rod. Once you’ve done that, adjust the fabric so 4 inches is left at the top. You will use this flap to fold over the 2nd dowel rod, creating a pocket for it. (see photo)

- Step 7. Use a strip of Steam-A-Seam to bond the face up fabric to the back side of the fabric beneath it.
- Step 8. Apply 2 strips of Steam-A-Seam to the top of the face up fabric, fold the 4″ flap over the dowel rod and onto the 2 strips. Iron to create the 2nd pocket. Sorry if this gets a little wordy. I’ve included a photo with illustrations and notes to clear things up.

- Step 9. Insert dowel rods into both pockets.
- Step 10. Mount double curtain rods brackets and then slip dowel rods into the brackets. Voila! Easy, affordable book storage that takes no time at all to put together!


Latest posts by Rebecca Mickler (see all)
- Colors of The Year 2022 - August 27, 2021
- Mix and Match Outdoor Furniture Materials - April 21, 2021
- Design Trends 2021 – Green Is The New Blue (Finally) - February 1, 2021